Catalyst, Makeswift & Payload CMS
The new Catalyst CLI makes it super easy to get started with a blazingly fast Catalyst site running on Next.js. You’ll also be able to add pages and content with Makeswift in a no-code drag-and-drop page builder, thanks to the built-in integration with Catalyst CLI. And if you want more, you can easily connect an external CMS like Payload CMS. Let’s get started!
Setup
Environment Requirements
Node version 20 - required for Catalyst
nvm use 20
Package manager: pnpm for less disk space usage
npm install -g pnpm
macOS 14 Sonoma
If you’re on Windows, WSL2 with Ubuntu is recommended
Create Catalyst Site with CLI
BigCommerce provides an easy-to-use CLI tool to set up Catalyst projects, so we’ll use that to get started. We’ll also use the Makeswift integration with the CLI so we can start using Makeswift as soon as the CLI tool finishes!
Note: If node version 20 isn’t your default version, open a new terminal window run nvm use 20 to switch to v20 before you run the following command.
Run the following command in a new terminal window:
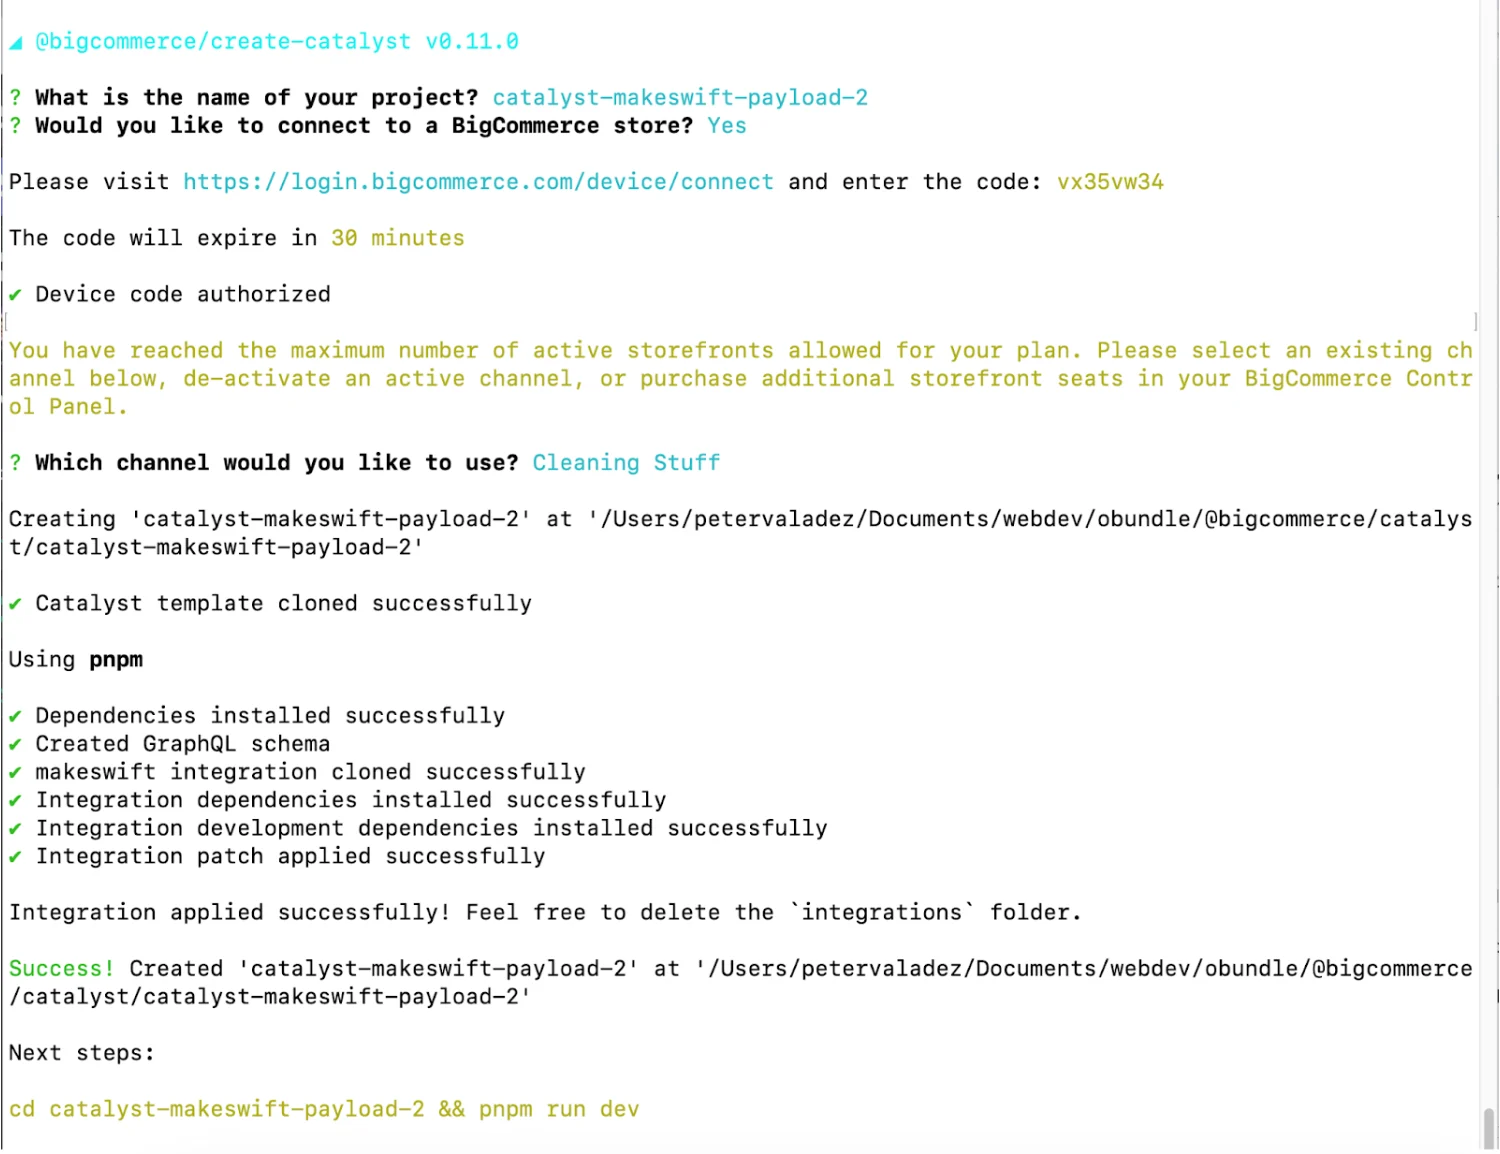
pnpm create @bigcommerce/catalyst@latest --integration=makeswift
Name Your Catalyst Project
> What is the name of your project? catalyst-makeswift-payload
Connect to your store
> Would you like to connect to a BigCommerce store? Yes
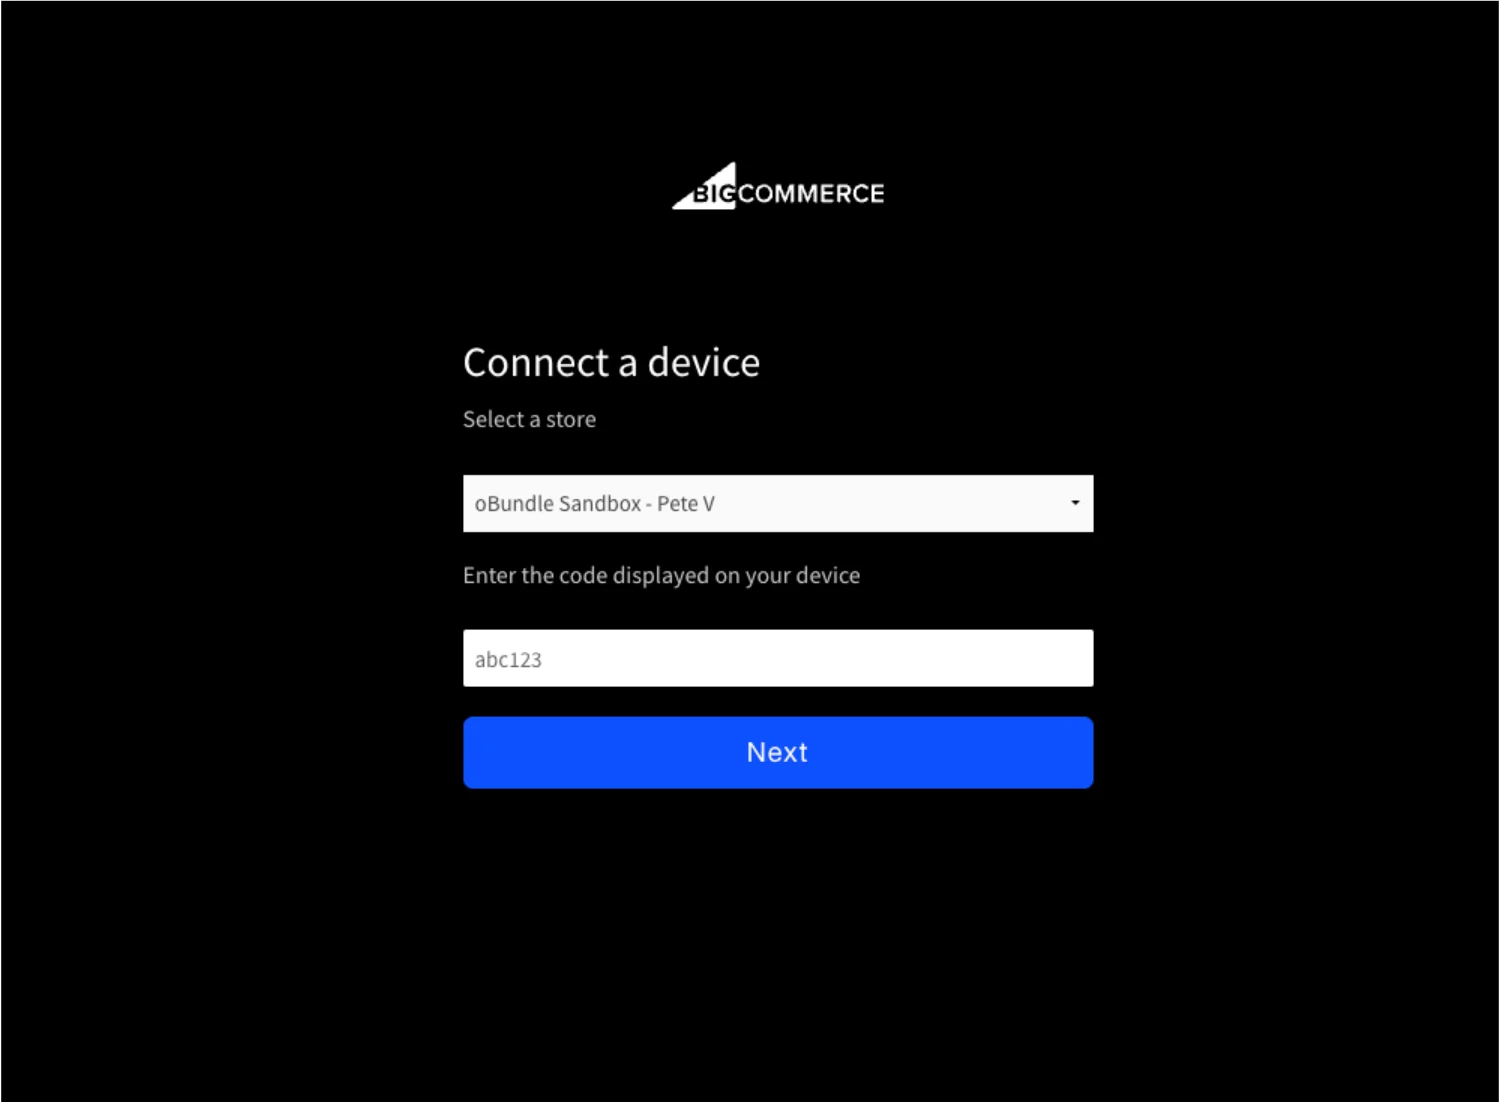
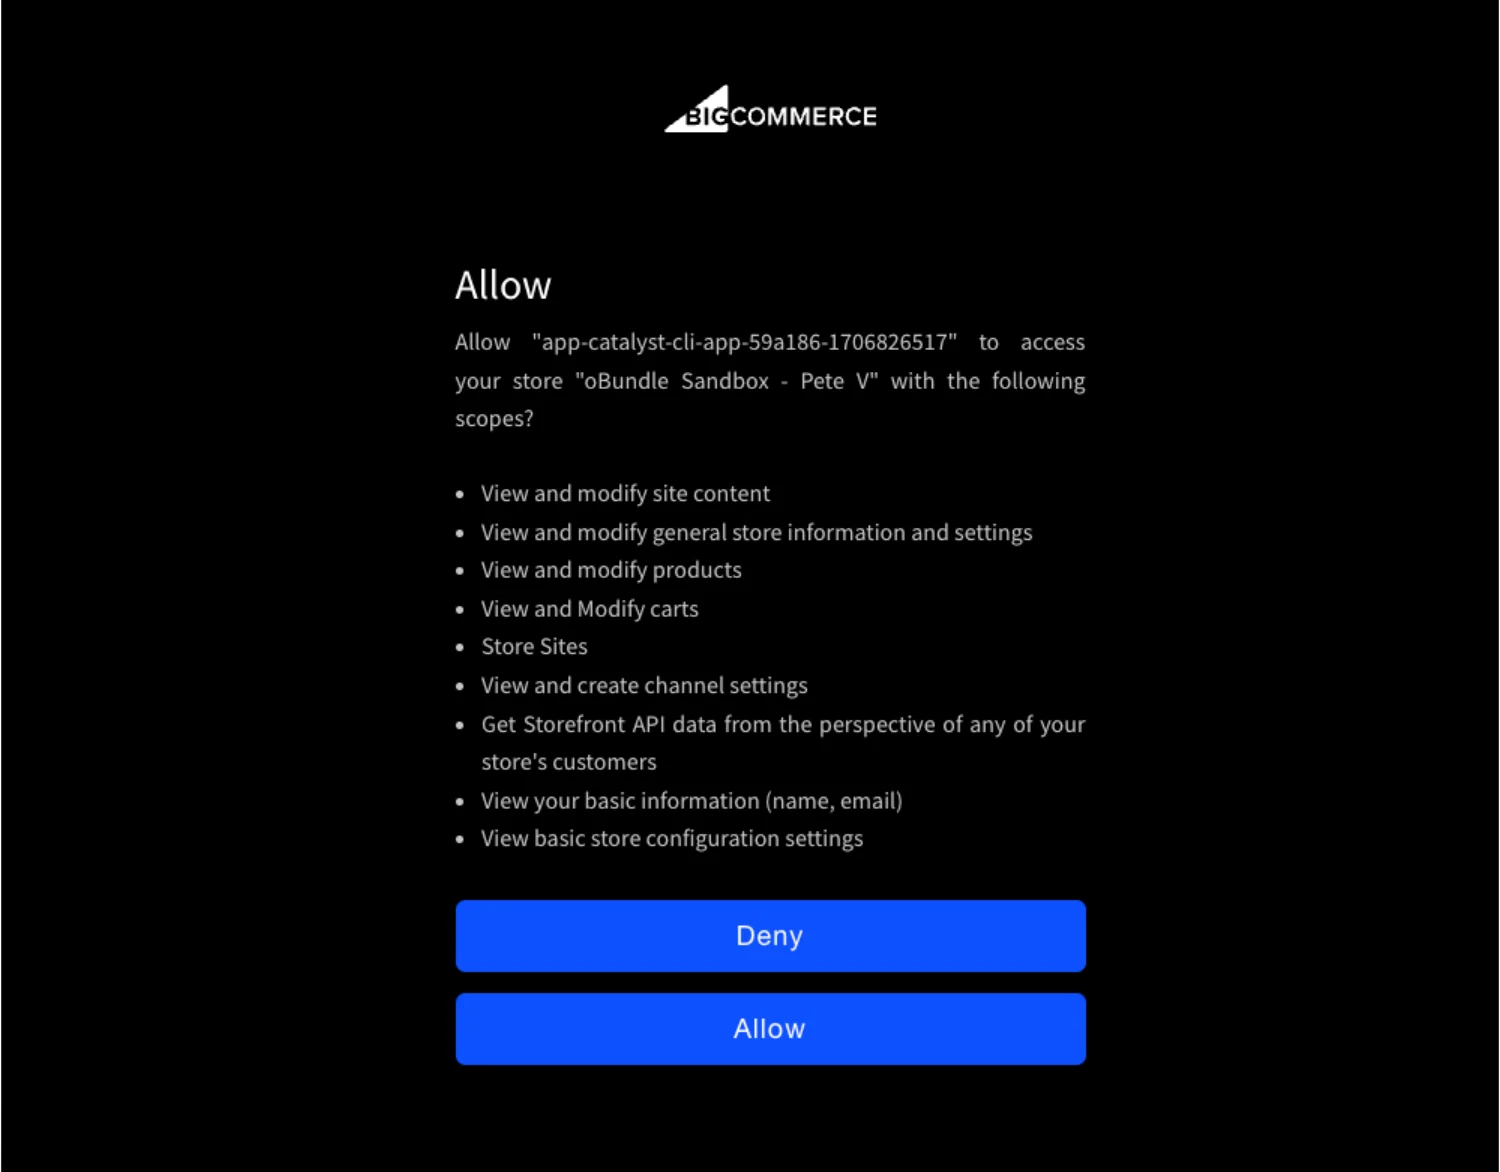
To connect Catalyst to your store, when prompted:
Log into your BC account, and select the store you want to connect
Enter the code provided
Click “Allow” button
If successful, the terminal where you’re running the Catalyst CLI will move to next step
Create a new Catalyst channel or connect to an existing channel:
CLI Automatically Installs Makeswift Integration Code
If everything goes as planned, you should see the Catalyst first install the base dependencies. Then it should install the Makeswift integration code along with any Makeswift dependencies.
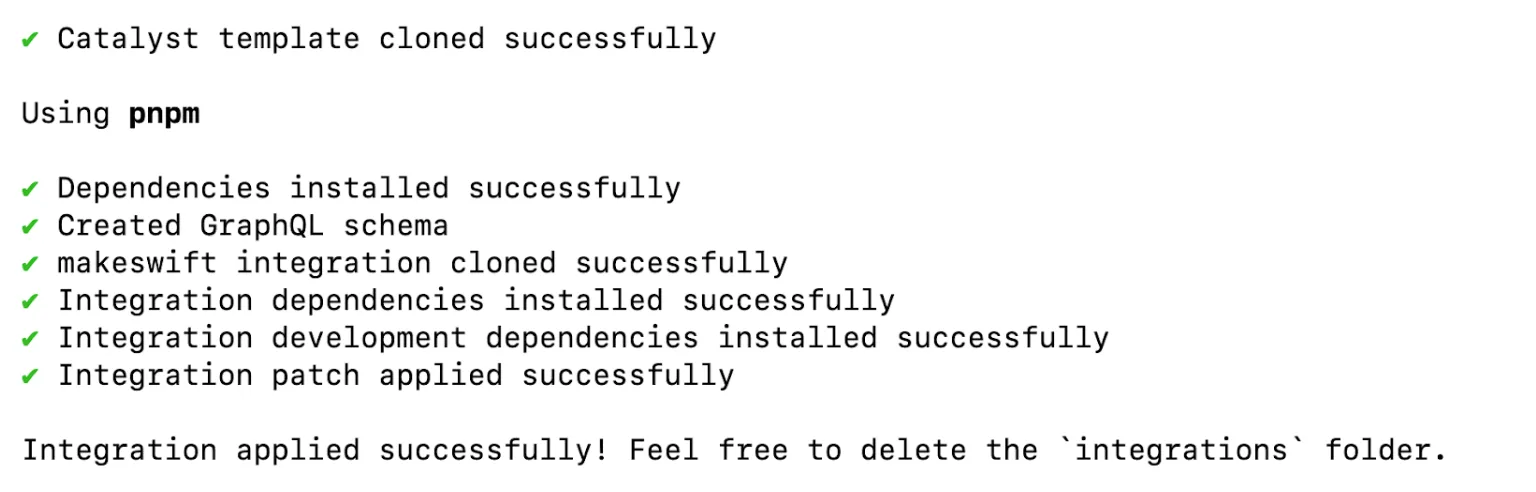
Success! 🎉
Open your new Catalyst project in your code editor and start it up!
Open new “catalyst-makeswift-payload” folder in vscode:
code catalyst-makeswift-payload
Open a terminal in vscode… again make sure you’re using node.js v20(run nvm use 20), and start up dev mode:
pnpm dev
Note: If the Catalyst CLI doesn’t create an .nvmrc file in your project, go ahead and add one with the contents “20”: https://github.com/bigcommerce/catalyst/blob/main/.nvmrc
The .nvmrc file allows you to simply run nvm use in your project to switch to node v20. If you’re feeling extra lazy like me, you can set up your terminal shell to automatically detect .nvmrc files so it changes to the right version as soon as you open a shell in your project: https://github.com/nvm-sh/nvm?tab=readme-ov-file#deeper-shell-integration
Start Up Catalyst and Start Making Pages with Makeswift
Since we chose to use the Makeswift integration with the Catalyst CLI, all we need to do to start using Makeswift is to create a free account(super easy) and do a few setup steps:
Create a free Makeswift Account
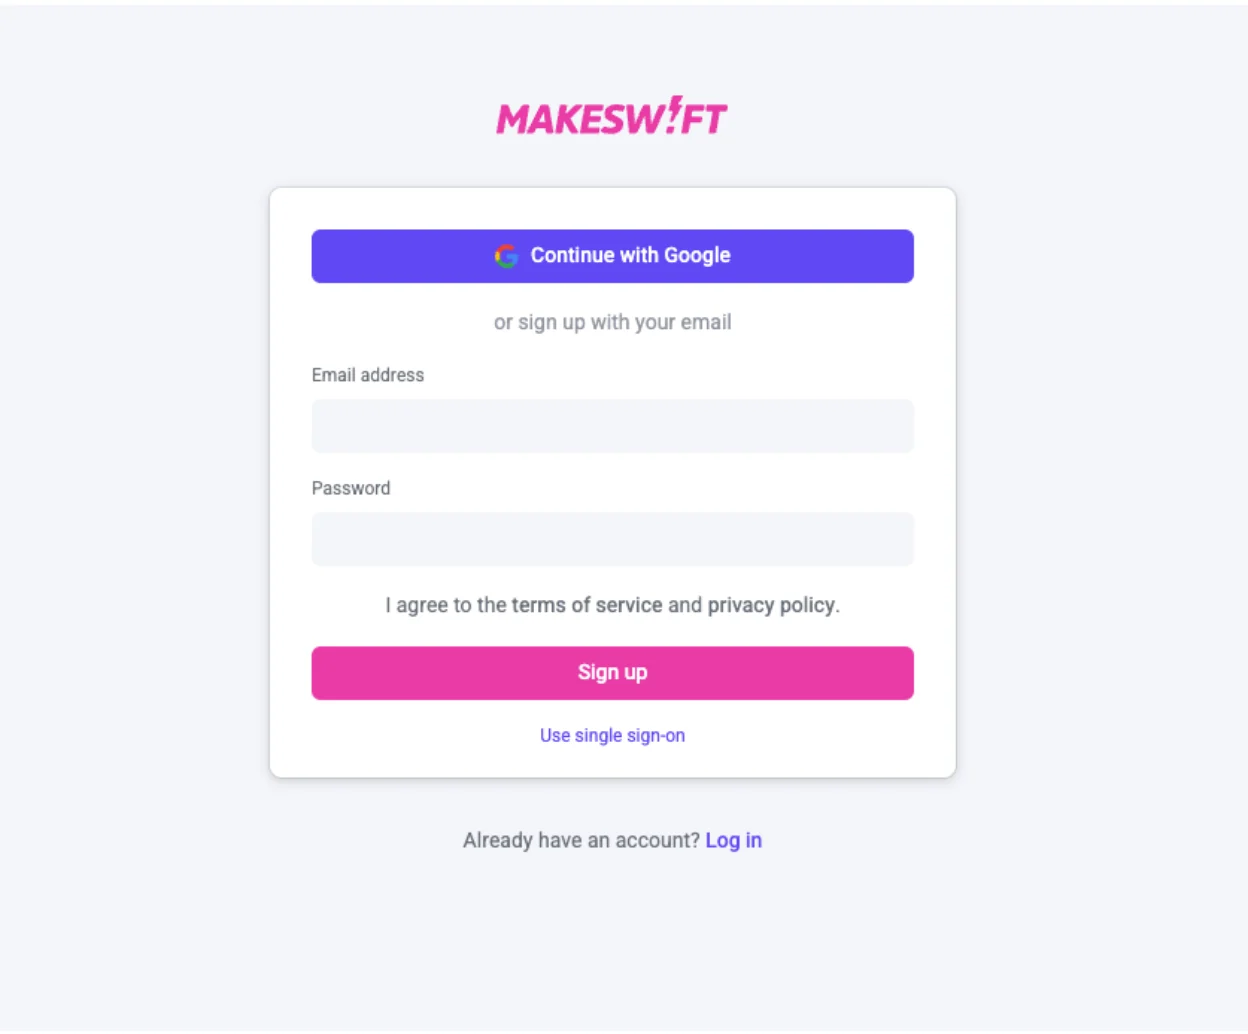
Get Makeswift API Key
First get your api key from your Makeswift account and save it for the next step:
Step 3 here: https://docs.makeswift.com/developer/app-router/installation
Create Environment Variable for Makeswift API Key
The CLI tools creates a new example key in .env.example called MAKESWIFT_SITE_API_KEY. You just need to create this environment variable in .env.local and copy your Makeswift API Key there.
In the Makeswift builder, go to Settings > Host and copy the API key for the site.
Then add the key to .env.local — it should have a new entry like this:
MAKESWIFT_SITE_API_KEY=a2282fle-n7z8-6133-5386-d27577v99bs8
Start Catalyst Local Dev Mode
pnpm dev
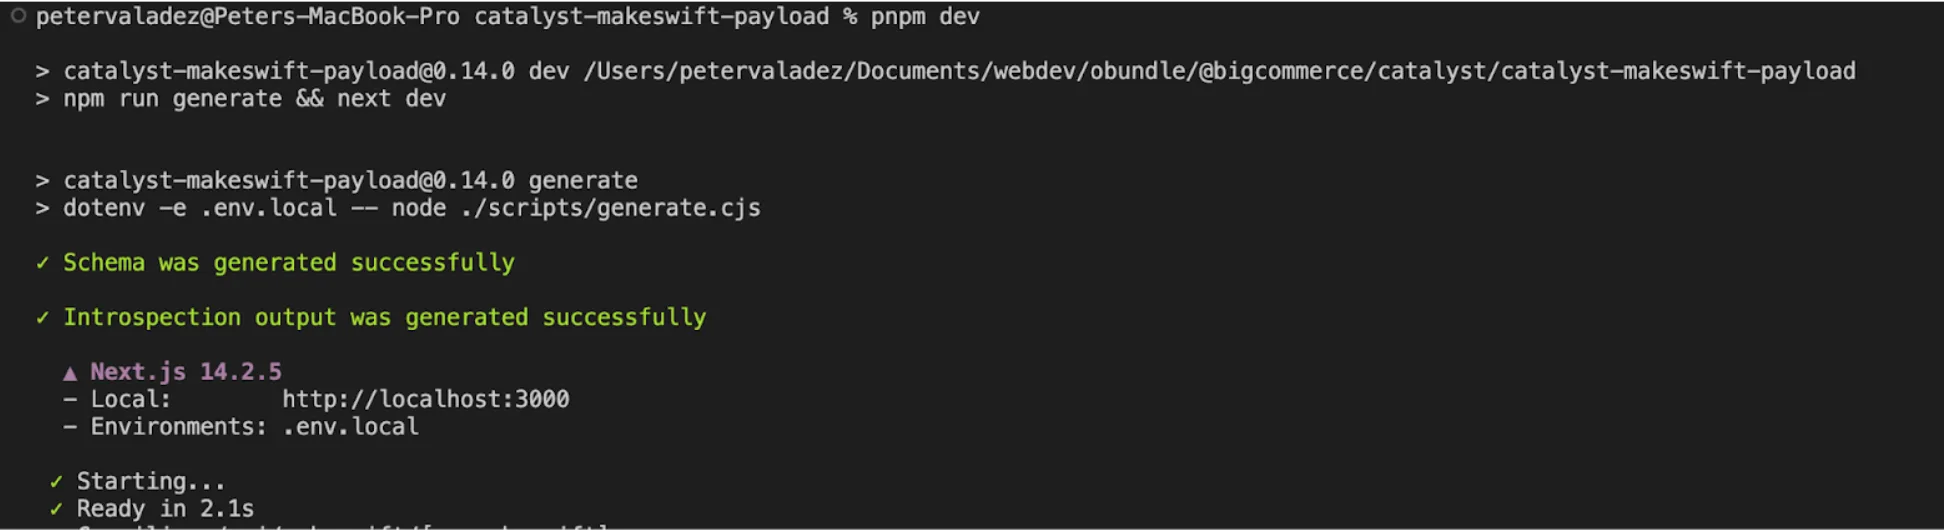
At this point you can visit http://localhost:3000 in your browser and you should see the Catalyst homepage rendered. 🎉
Create a Makeswift Project and Set Host to localhost
To start creating content in Makeswift, the last step is to update the Host URL setting in your Makeswift project. Go to Settings > Host, and set Host URL to http://localhost:3000:
You may need to refresh the page and possibly clear cache for that browser page. If all goes to plan, you should then see the address in the Makeswift editor be updated to http://localhost:3000 and your Makeswift content should render in the editor!
With that, you’re ready to start making new content with all the magic of Makeswift! As soon as you publish the page, your content will render both locally and your live site (Next.js may cache data in Catalyst, so you may need to run a new deployment, or else set up a mechanism to revalidate your Makeswift page).
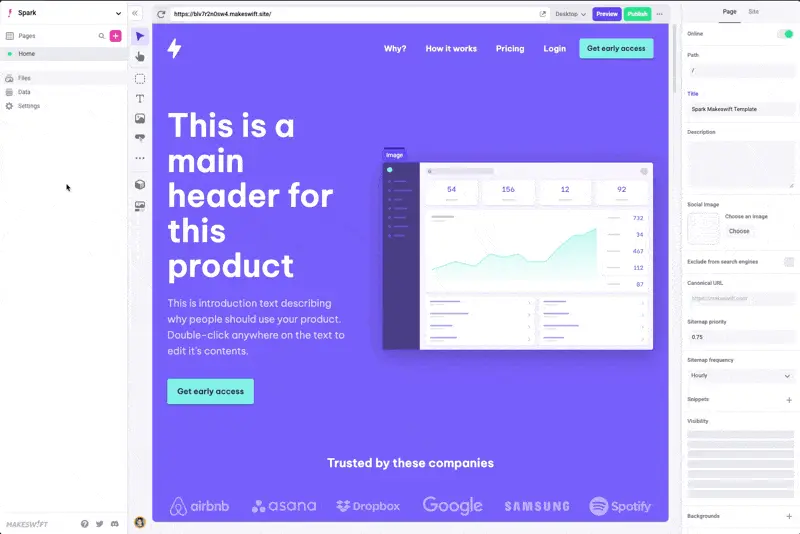
Swiftly Make Some Makeswift Content!
Start with a Makeswift page template or use your own custom components to make new pages in Makeswift. The Catalyst CLI will have already created a few components in your Catalyst code that are registered with Makeswift, so you can immediately start using those or use them as a template to make your own. In the Makeswift editor you can create global components using any custom or premade component, so all instances of that global component will look the same on all pages.
Note: The path/URL configured for your page in Makeswift should not match any existing URL on your BigCommerce store. While you can configure the Makeswift client to render content anywhere on your Catalyst site, the CLI integration is set up on the catch-all route at app/[locale]/(default)/[...rest]/page.tsx
⚠️ Troubleshooting Note: At the time of this demo, the Makeswift Integration option with Catalyst CLI enables Makeswift Locales. However, Locales will only work with an Enterprise Makeswift account. To get around this, all I needed to do is comment out locale: params.locale, in the call to client.getPageSnapshot()in app/[locale]/(default)/[...rest]/page.tsx:

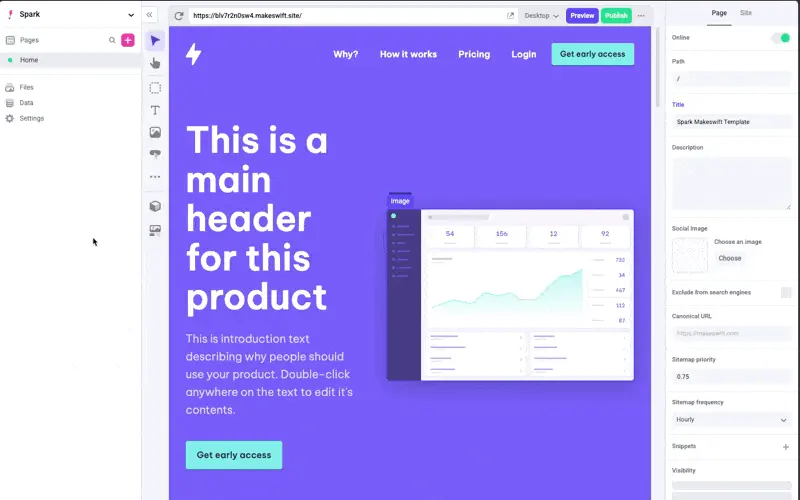
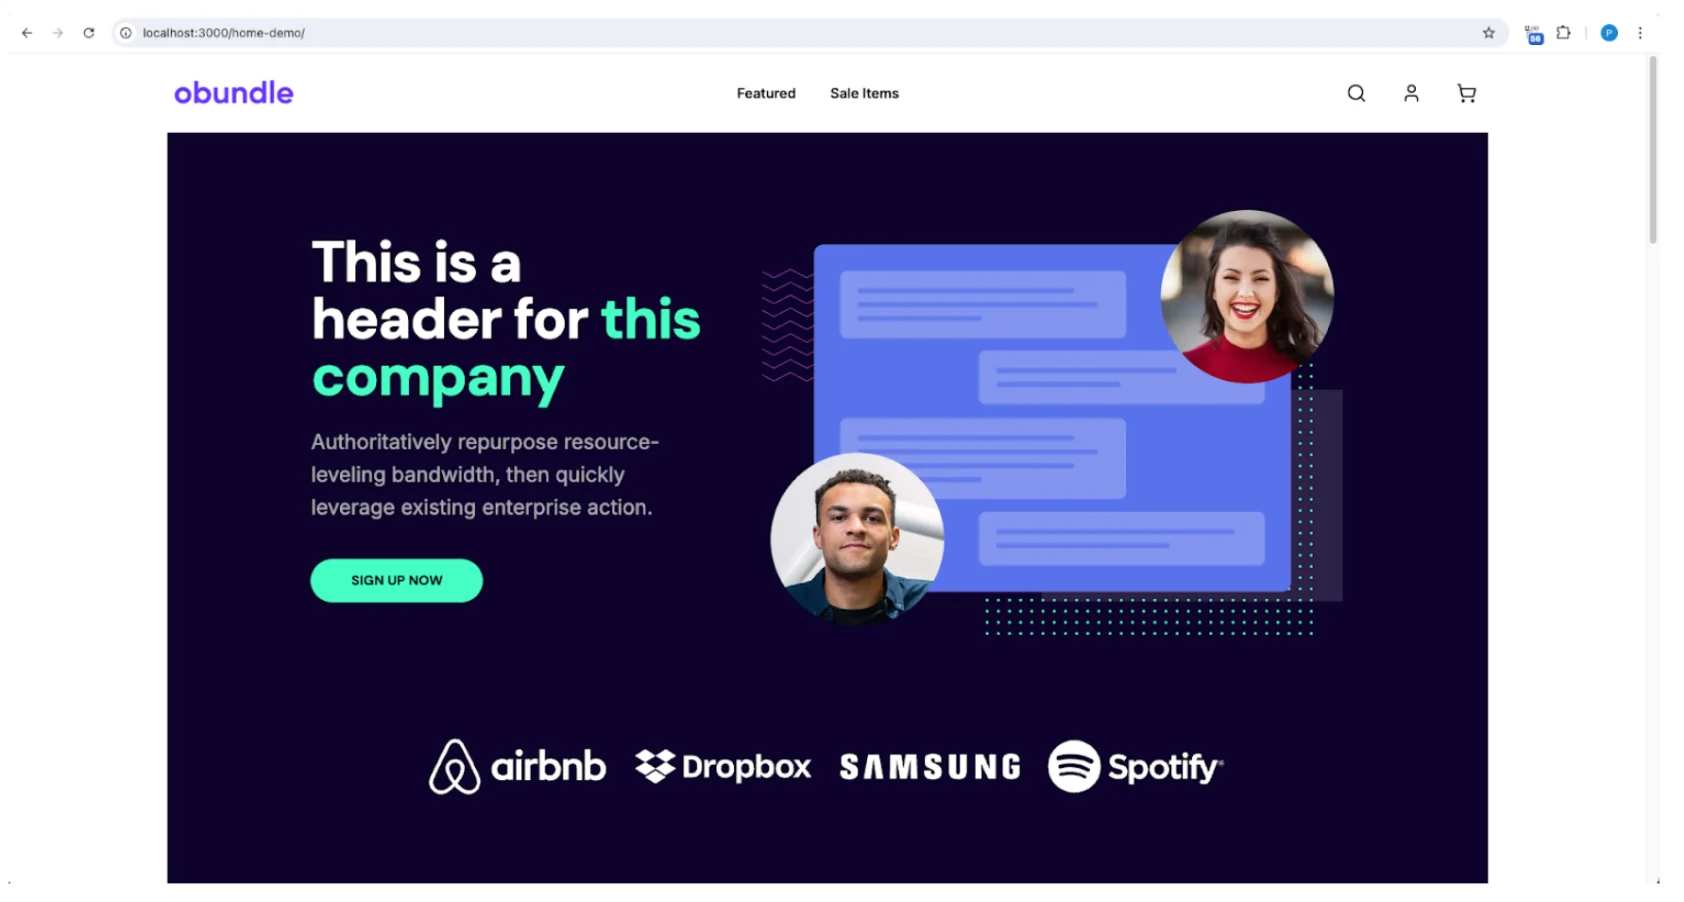
Instant content rendered locally in Catalyst theme from Makeswift’s “Venture” project template:
Already Have a CMS?
Makeswift makes it super easy to start creating content in Catalyst and even allows you to dynamically pull in data from external sources, such as Google Sheets, using Zapier. However, you might already have a CMS, or you want to use any number of features that a full-featured CMS provides. There is a bit more work involved, but it’s fairly simple to integrate any CMS with Catalyst! Better yet, you can have both: use Makeswift for some pages and your CMS for others… or even pull data from your CMS into Makeswift components! For this demo, we’ll use Payload CMS to control the blog pages on our Catalyst site. We will use a seeding script to programmatically create blog posts in the Payload database, and then we’ll render those blogs in Catalyst… let’s get started!
Note: Are you loving Makeswift? You can use Makeswift for your blog too!
Payload CMS Setup
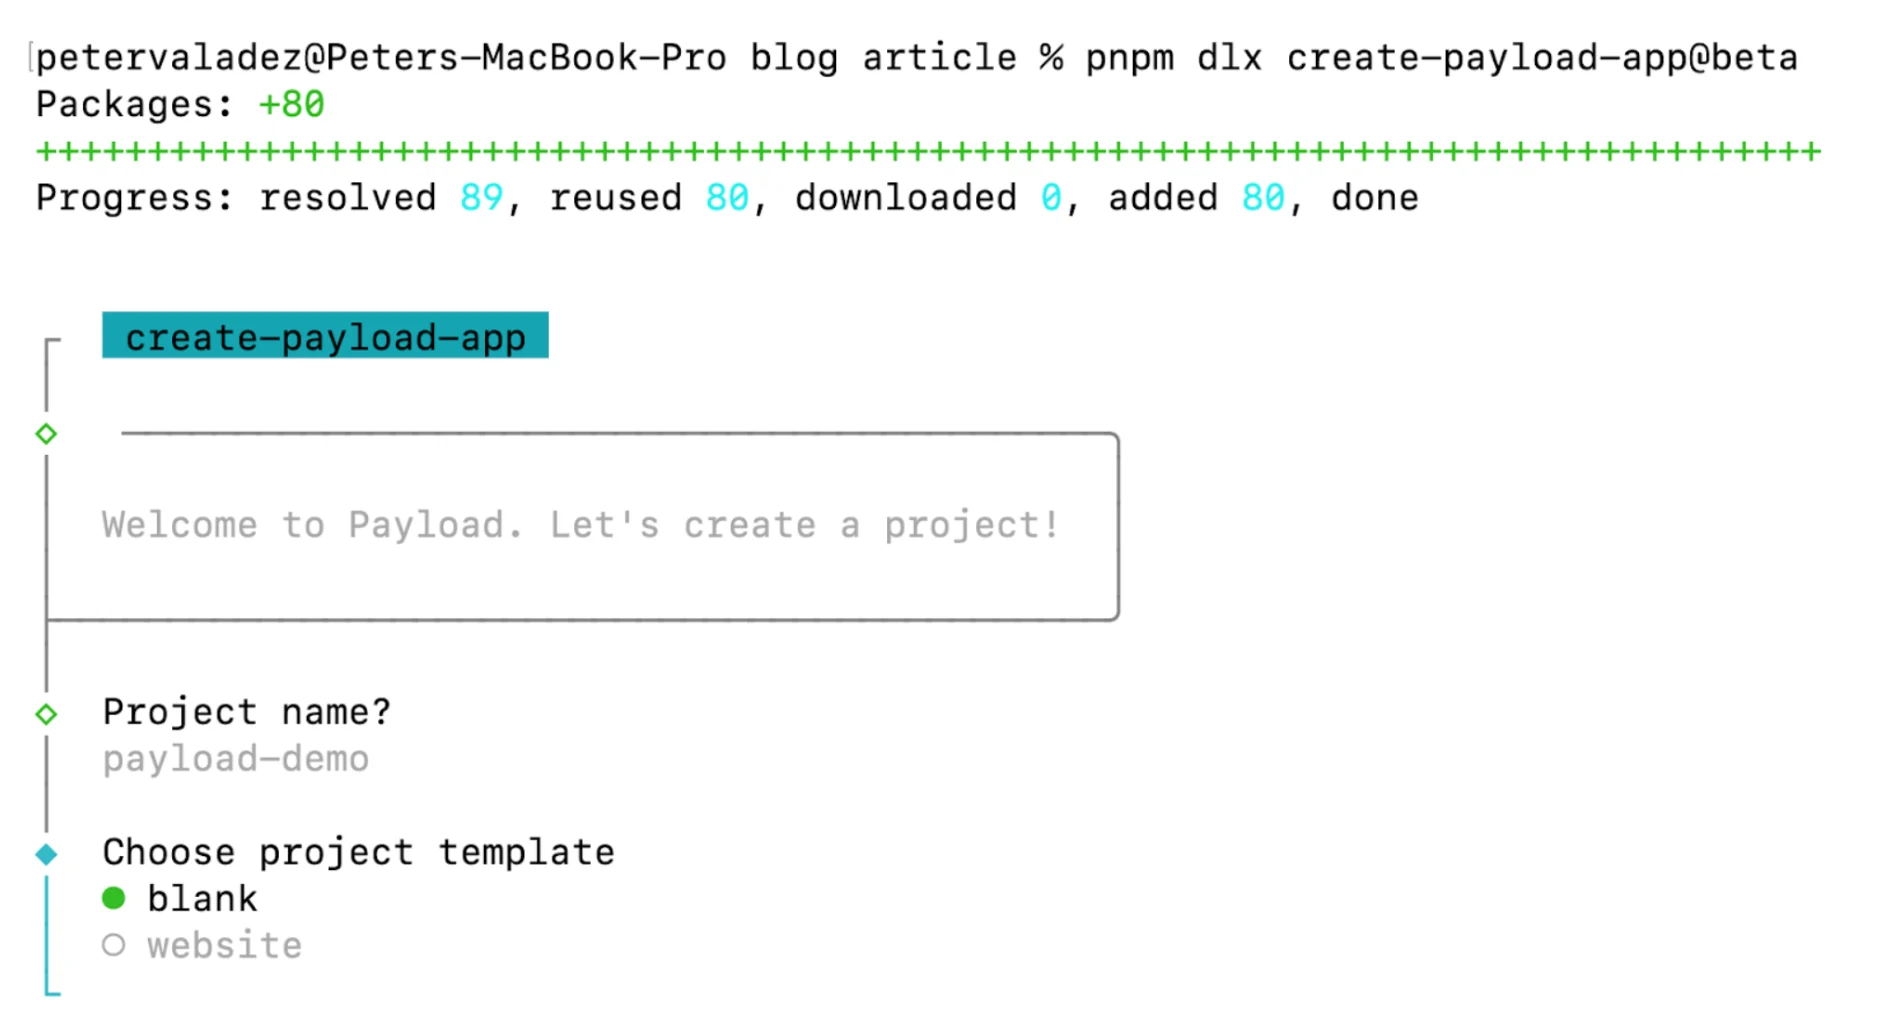
Back in your terminal window, run the following command to make a new Payload CMS project:
pnpm dlx create-payload-app@beta
Note: Make sure you’re still using node version 20 for the Payload CMS setup script above. Additionally, you can again create a .nvmrc file in your payload project root when the CLI finishes.
Choose a project template
We’ll use the blank template for this demo, but the website template comes with a full implementation of a website with a blog and contact form… even Payload’s live preview feature!
Select Database
We’ll use a Postgres database from Vercel to make it easy to deploy to Vercel.
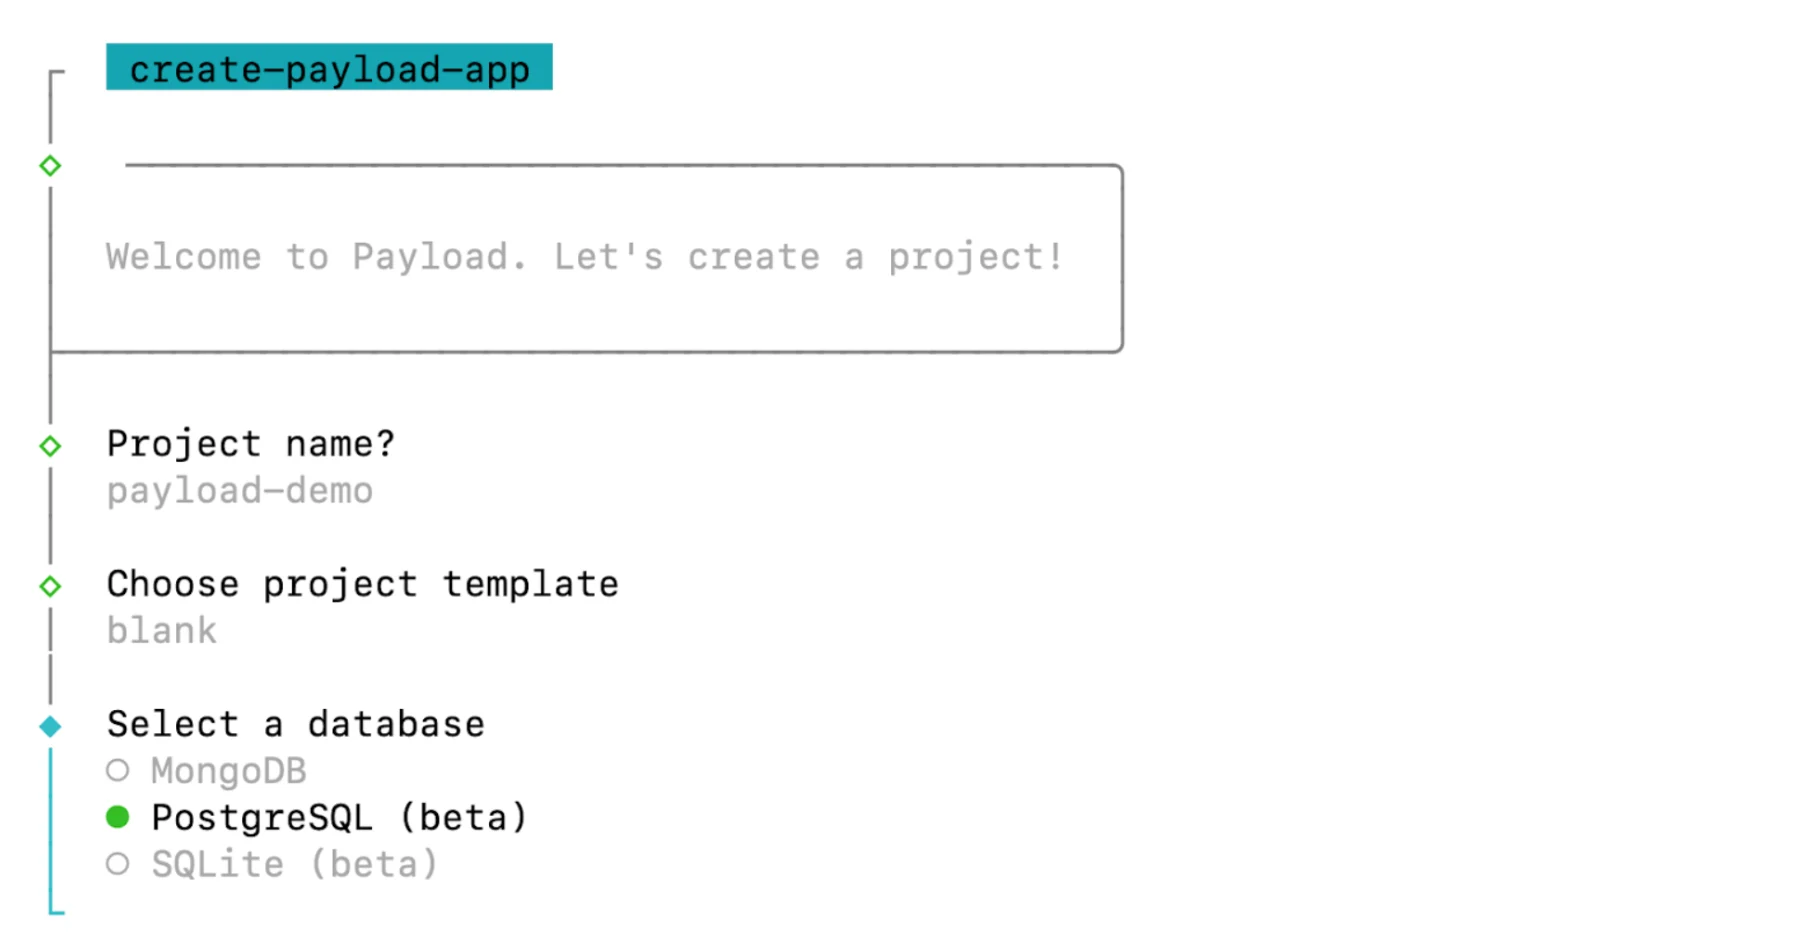
Note (about Payload Database): Payload CMS was originally built to use MongoDB, but the latest v3 beta version includes support for both PostgreSQL and most recently, sqlite! This means you’ll be able to use Vercel’s Postgres Database service or Turso for sqlite, in addition to MongoDB Atlas. The sqlite database is a great option if you want to quickly start a payload cms project without having to set up a database… the payload install script will simply create a local .db file for your sqlite database! For this demo we’ll use the Postgres database so we can easily deploy Payload to Vercel.
Database Connection String
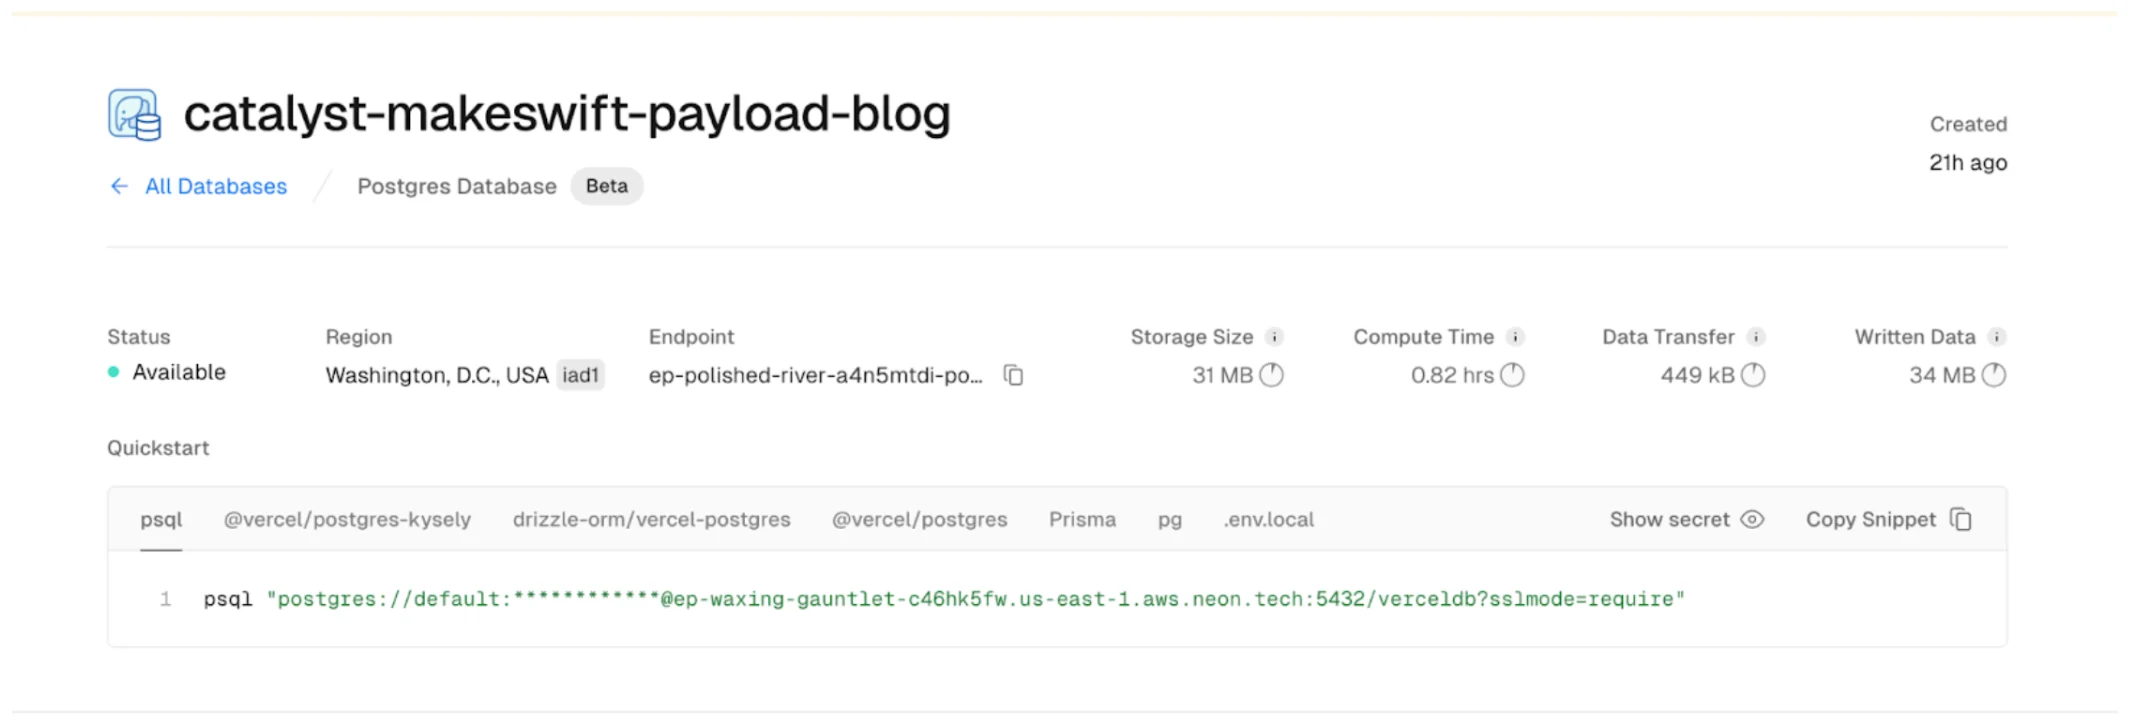
To get a connection string, we need to create a Postgres database on Vercel.
Install Vercel Postgres DB
Follow directions here: https://vercel.com/docs/storage/vercel-postgres/quickstart#create-a-postgres-database
Copy Connection String
When the database is created, you should have access to the connection string. Copy the snippet for the default “psql” option and then copy everything inside the double quotes. The string inside the double quotes is the connection string you need for Payload: psql “<connection_string>”
Paste Connection String into Payload CLI
Back in the terminal where you’re running create-payload-app@beta, paste the connection string. This will create an environment variable in .env with the key DATABASE_URI
Update Payload CMS Port and Start
When the payload cli script finishes, again open the newly created folder in vscode: code catalyst-makeswift-payload-blog
Next, you will want to change the port that Payload CMS runs on in dev mode, so you can run it at the same time Catalyst is running. Open packages.json and add --port 1337 to the end of the dev script. It should look like this:

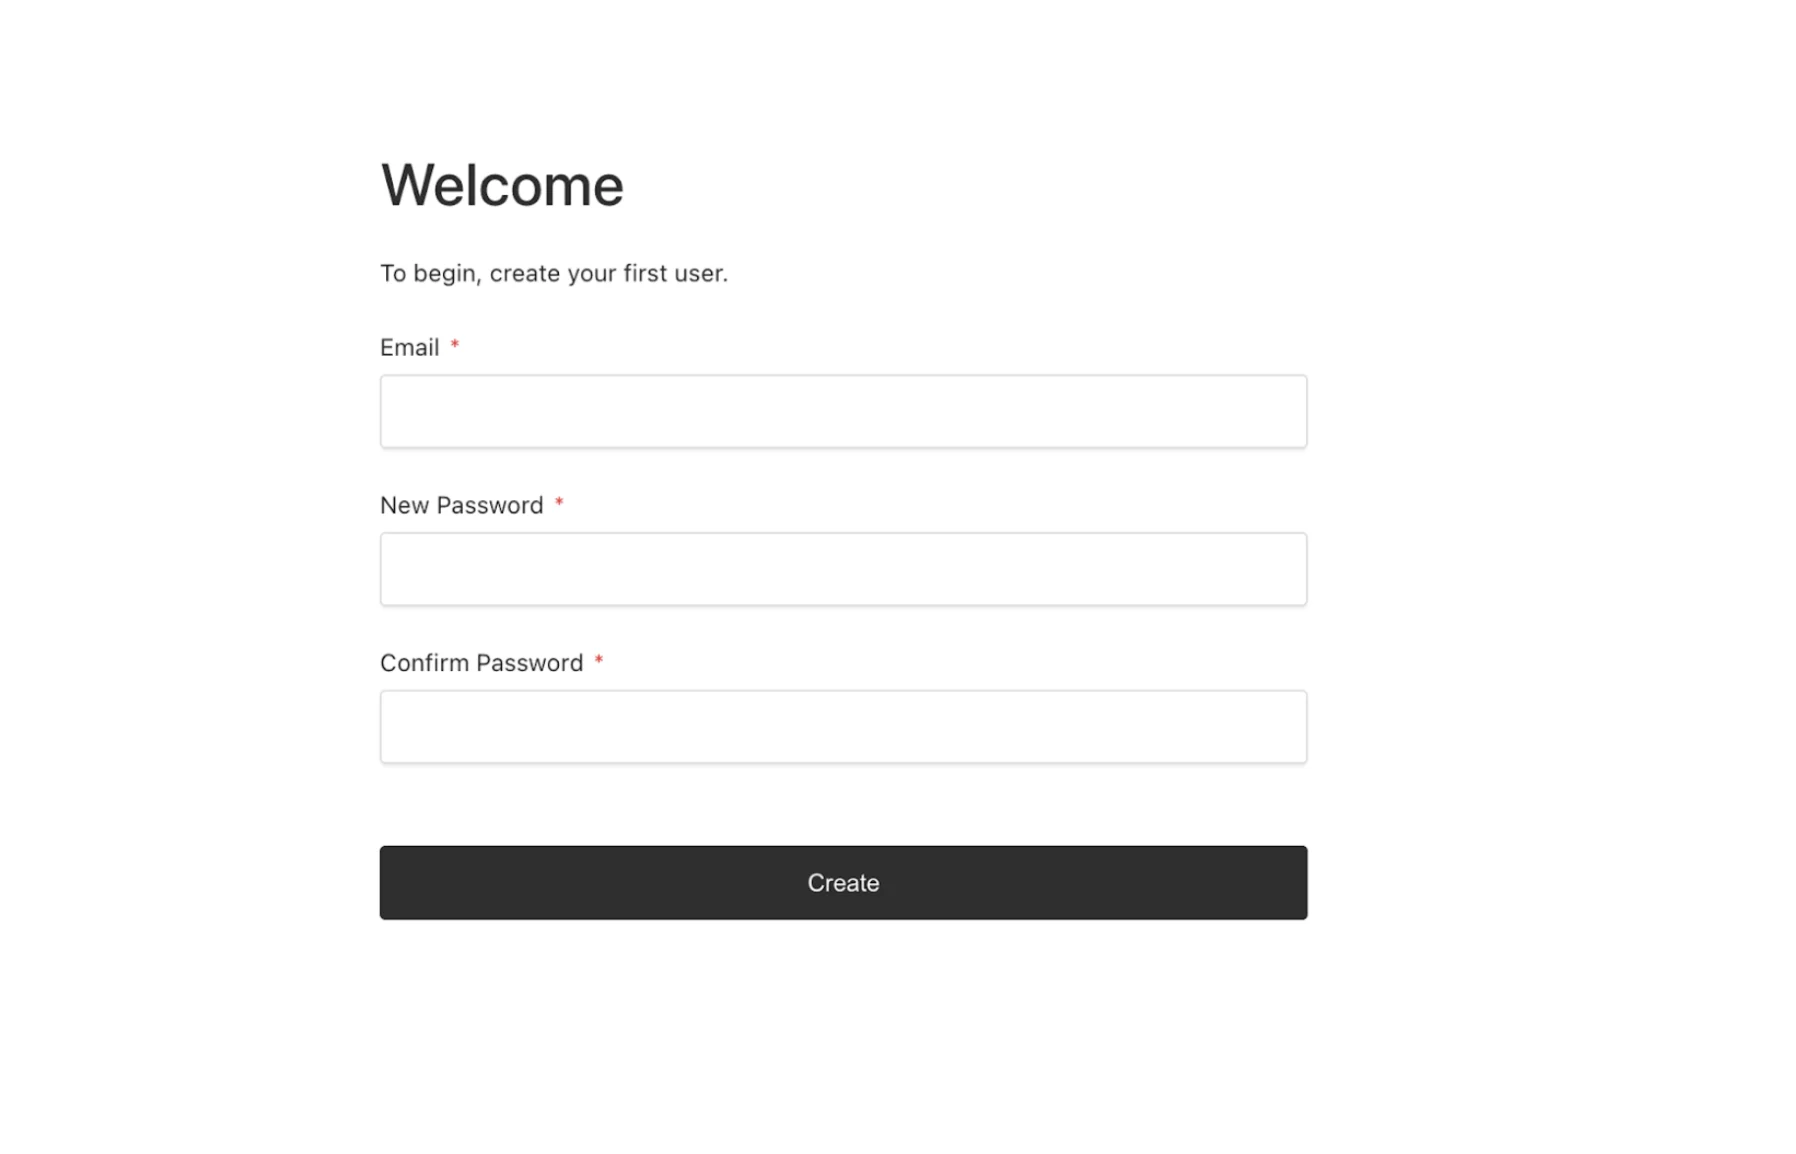
Start Payload CMS and Create Admin User
Start Payload CMS locally with: pnpm dev
When you start Payload CMS for the first time, you’ll be prompted to create an admin user. After that, you’re ready to start building!
A Note about Payload CMS Beta
We’re using Payload CMS version 3, which is currently still in beta but is expected to be released soon. Unlike Payload version 2, this new beta does not require running Next.js in custom server mode, and is very easy to add to an existing Next.js project, including a Catalyst project!
That means you’ll be able to easily deploy one repo to Vercel (or Dockerize and host on your own server) and run both your Catalyst store and Payload CMS in one instance of Next.js.
Running Catalyst and Payload together also gives you the option of using Payload’s local API, meaning you get easy type safety from Payload’s auto-generated types and you eliminate network requests because Local API simply fetches Payload data straight from the database! For this demo, I’ll be deploying Payload as a separate instance to Vercel with a Vercel Postgres database. More on that later!
Note (on Next.js Turbo Mode): Both Catalyst and Payload v3 should work in turbo mode locally, but due to several packages being beta versions it may not work yet. As of Aug 22, 2024 there is an open issue with Next.js Turbo mode.
Payload CMS Schema
Before we import our blogs into Payload, we need to create the schema that our blogs will use to store their data. The schema also determines how that data is edited in the Payload admin panel. Payload is very easy and flexible to configure schema’s and to extend the capabilities of the admin panel, but for this demo we’ll keep it simple
Create a new file in the collections folder:
src/collections/BlogPosts.ts
https://gist.github.com/pvaladez/27bc8b9e8b2830d05f38047318b975e5
Add BlogPosts collection to payload configuration
In src/payload.config.ts, import the BlogPosts.ts collection file and add it to the collections array:
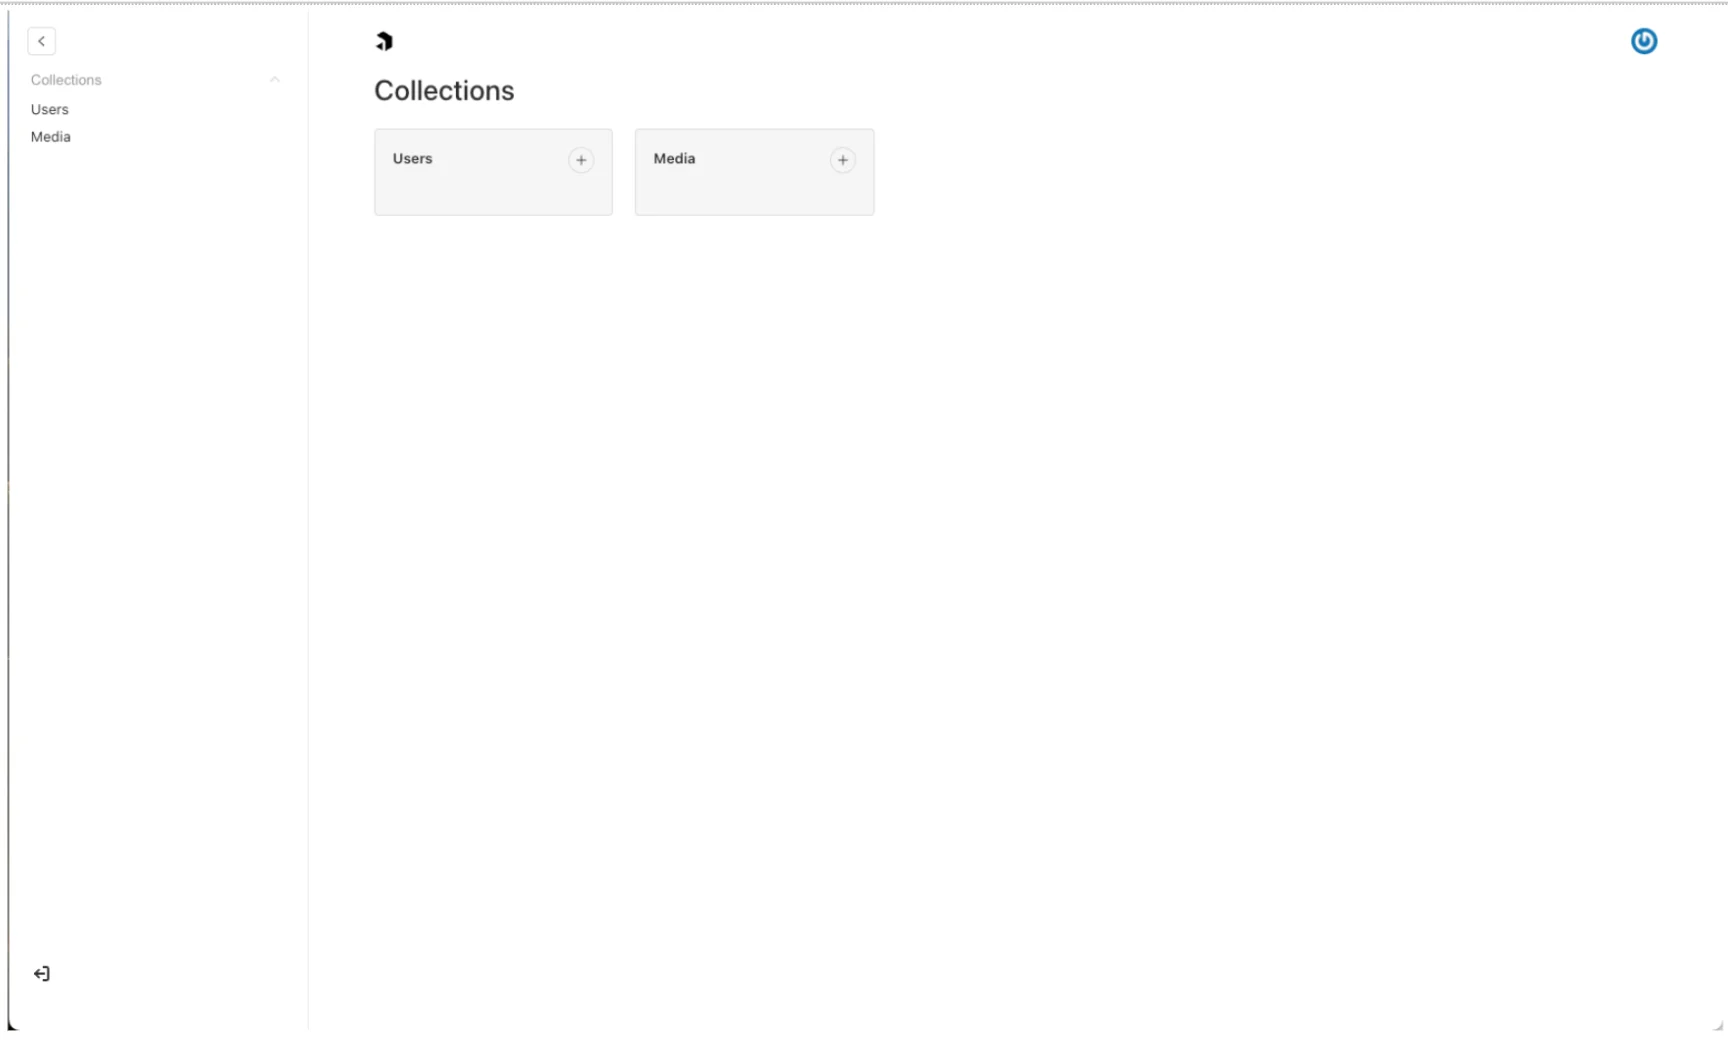
collections: [BlogPosts, Users, Media],
In the Payload admin panel you should now see an empty collection for Blog Posts:

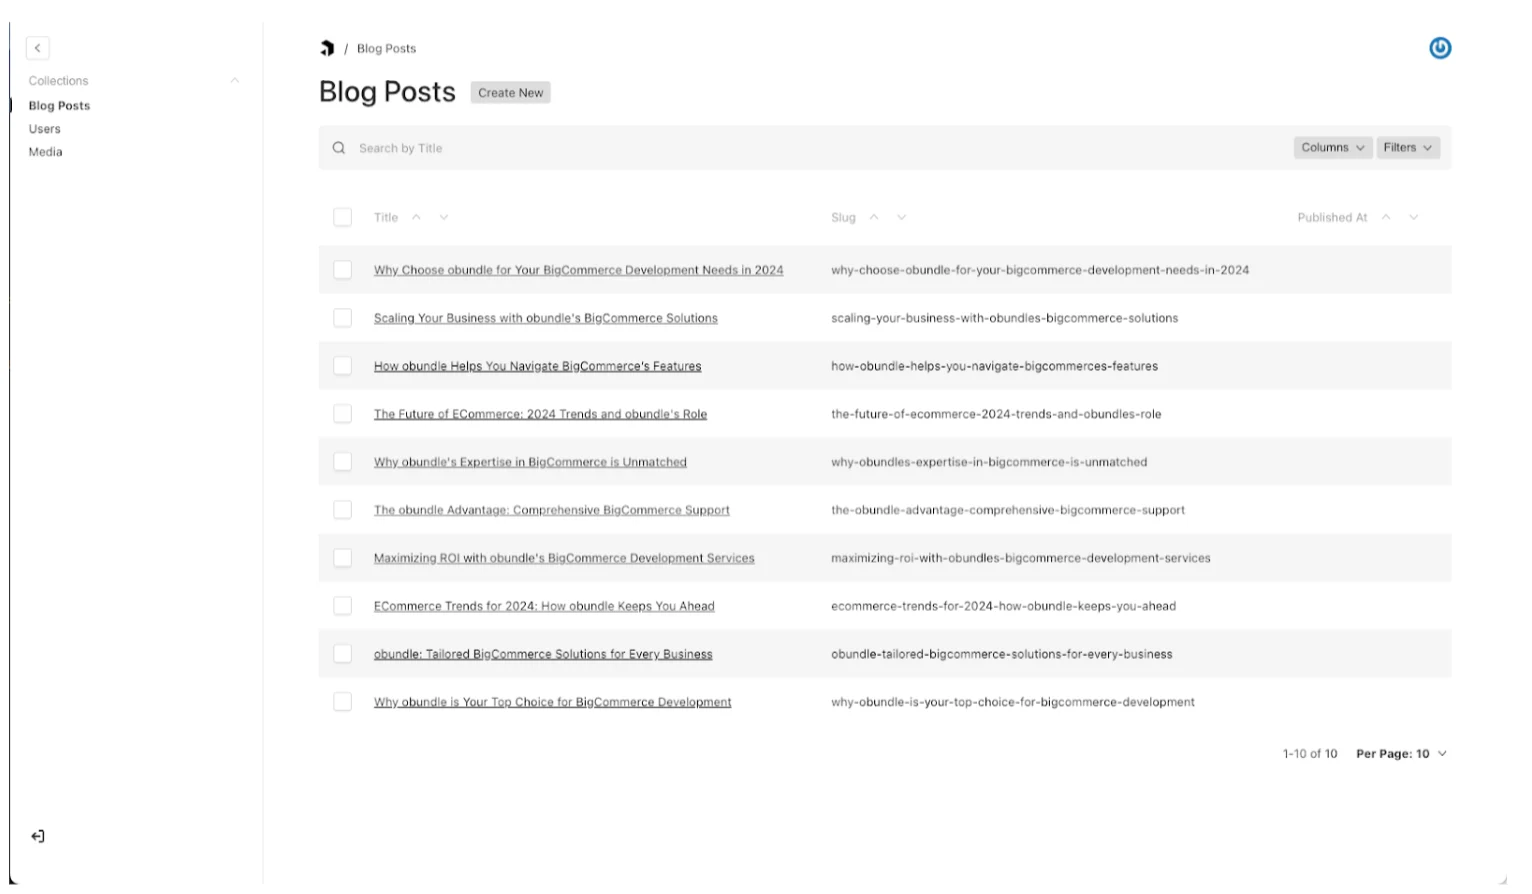
Payload CMS Data Import
Write a seeding script to create blogs in the database.
In our case we have a json file containing data that matches the shape of our data in the BlogPosts collection schema. Take a look!
To import our blog data into Payload, we’ll create a script that uses the Payload Local API to create new records on our Payload collection. We’ll use this example standalone script as a starting point.
The finished script will look like this. We can then simply run the script in our terminal in vscode to import the blogs.
pnpm seedBlogPosts

After the seed script completes successfully, we can start payload up and see our new blogs!
Blog Pages Frontend Setup
Next we need to modify the existing catalyst blogs route at app/[locale]/(default)/blog/page.tsx to fetch the blog posts from Payload local API and render the blogs.
Want to see an integration for a Strapi CMS blog?
A couple examples:
To modify the Catalyst frontend to pull in our blogs from Payload, we’ll use the Strapi CMS data fetching functions linked above as a starting point. Here’s what we ended up with.
You may have noticed that I used a new environment variable: NEXT_PUBLIC_PAYLOAD_URL. You will want to add this to .env.local in your Catalyst project. For local development, set it to localhost: NEXT_PUBLIC_PAYLOAD_URL=http://localhost:1337
When you deploy your Catalyst site to Vercel, just make sure to change the NEXT_PUBLIC_PAYLOAD_URL variable to the public URL of your Payload CMS site.
Note:
Environment variables that start with NEXT_PUBLIC_ will be made available to client side code. Make sure you don’t use any sensitive data in those type of variables.
Deploy to Vercel
Deploying both the Catalyst site and Payload CMS to Vercel is as simple as pushing to GitHub. In both cases that will look something like:
Create GitHub repo
Create a free tier project on Vercel and choose the GitHub repo from last step
Pro tip: when you create your project on Vercel copy all your environment variables from .env.local at once and paste them all into the first input
Run the following in terminal:
Initialize git locally inside your project folder: git init
Add git remote named origin pointing to your GitHub repo: git remote add origin git@github.com:pvaladez/catalyst-makeswift-payload.git
Commit your files and push to GitHub:
git add .
git commit -m "Create Catalyst project from CLI"
git branch -M main
git push -u origin main
As soon as you push your first commit to GitHub, Vercel will start deploying your site!
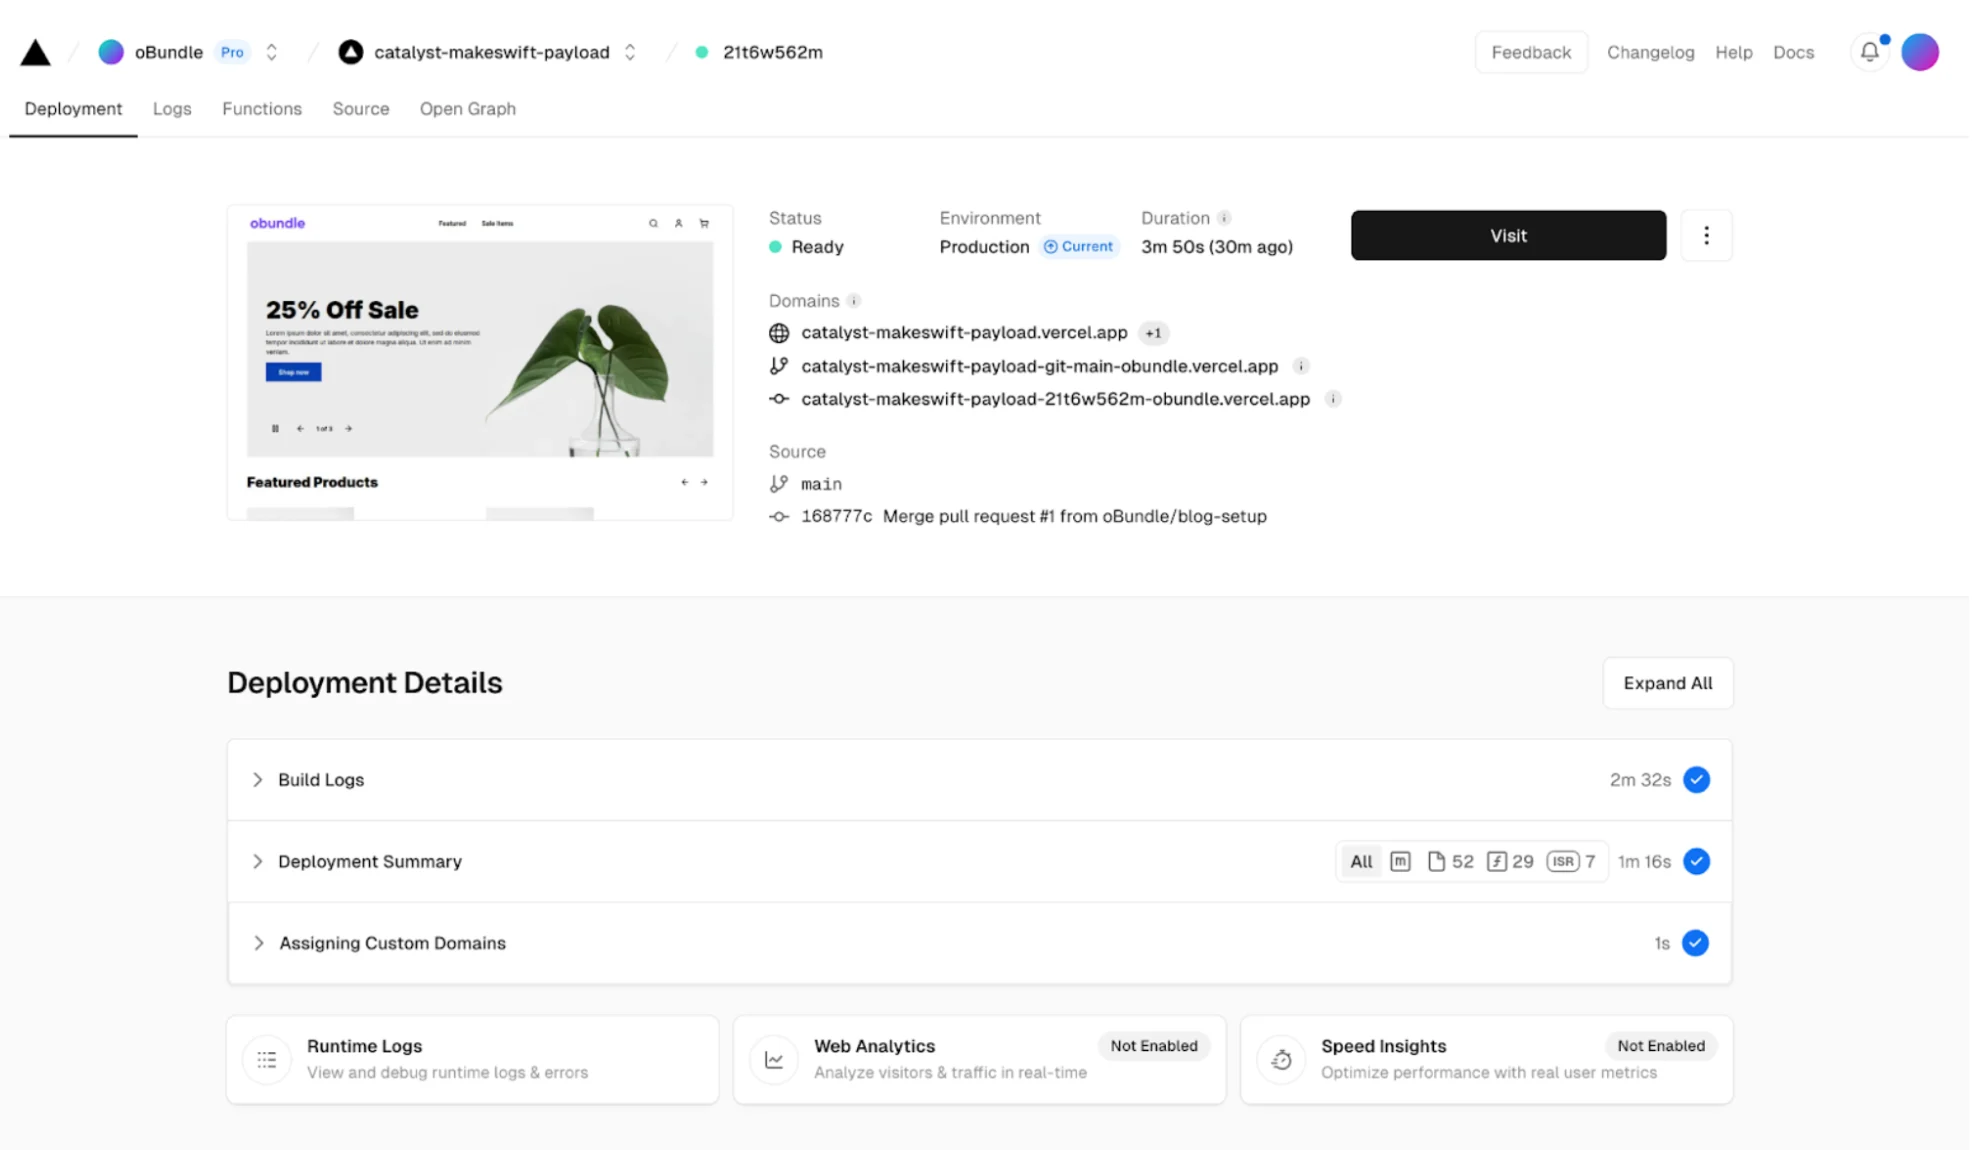
Note: You’ll probably want to deploy the Payload CMS site first, since Catalyst needs to pull data from the live Payload site. Also, after you deploy Payload CMS and have the public URL, remember to update the NEXT_PUBLIC_PAYLOAD_URL environment variable when setting up the Catalyst site.
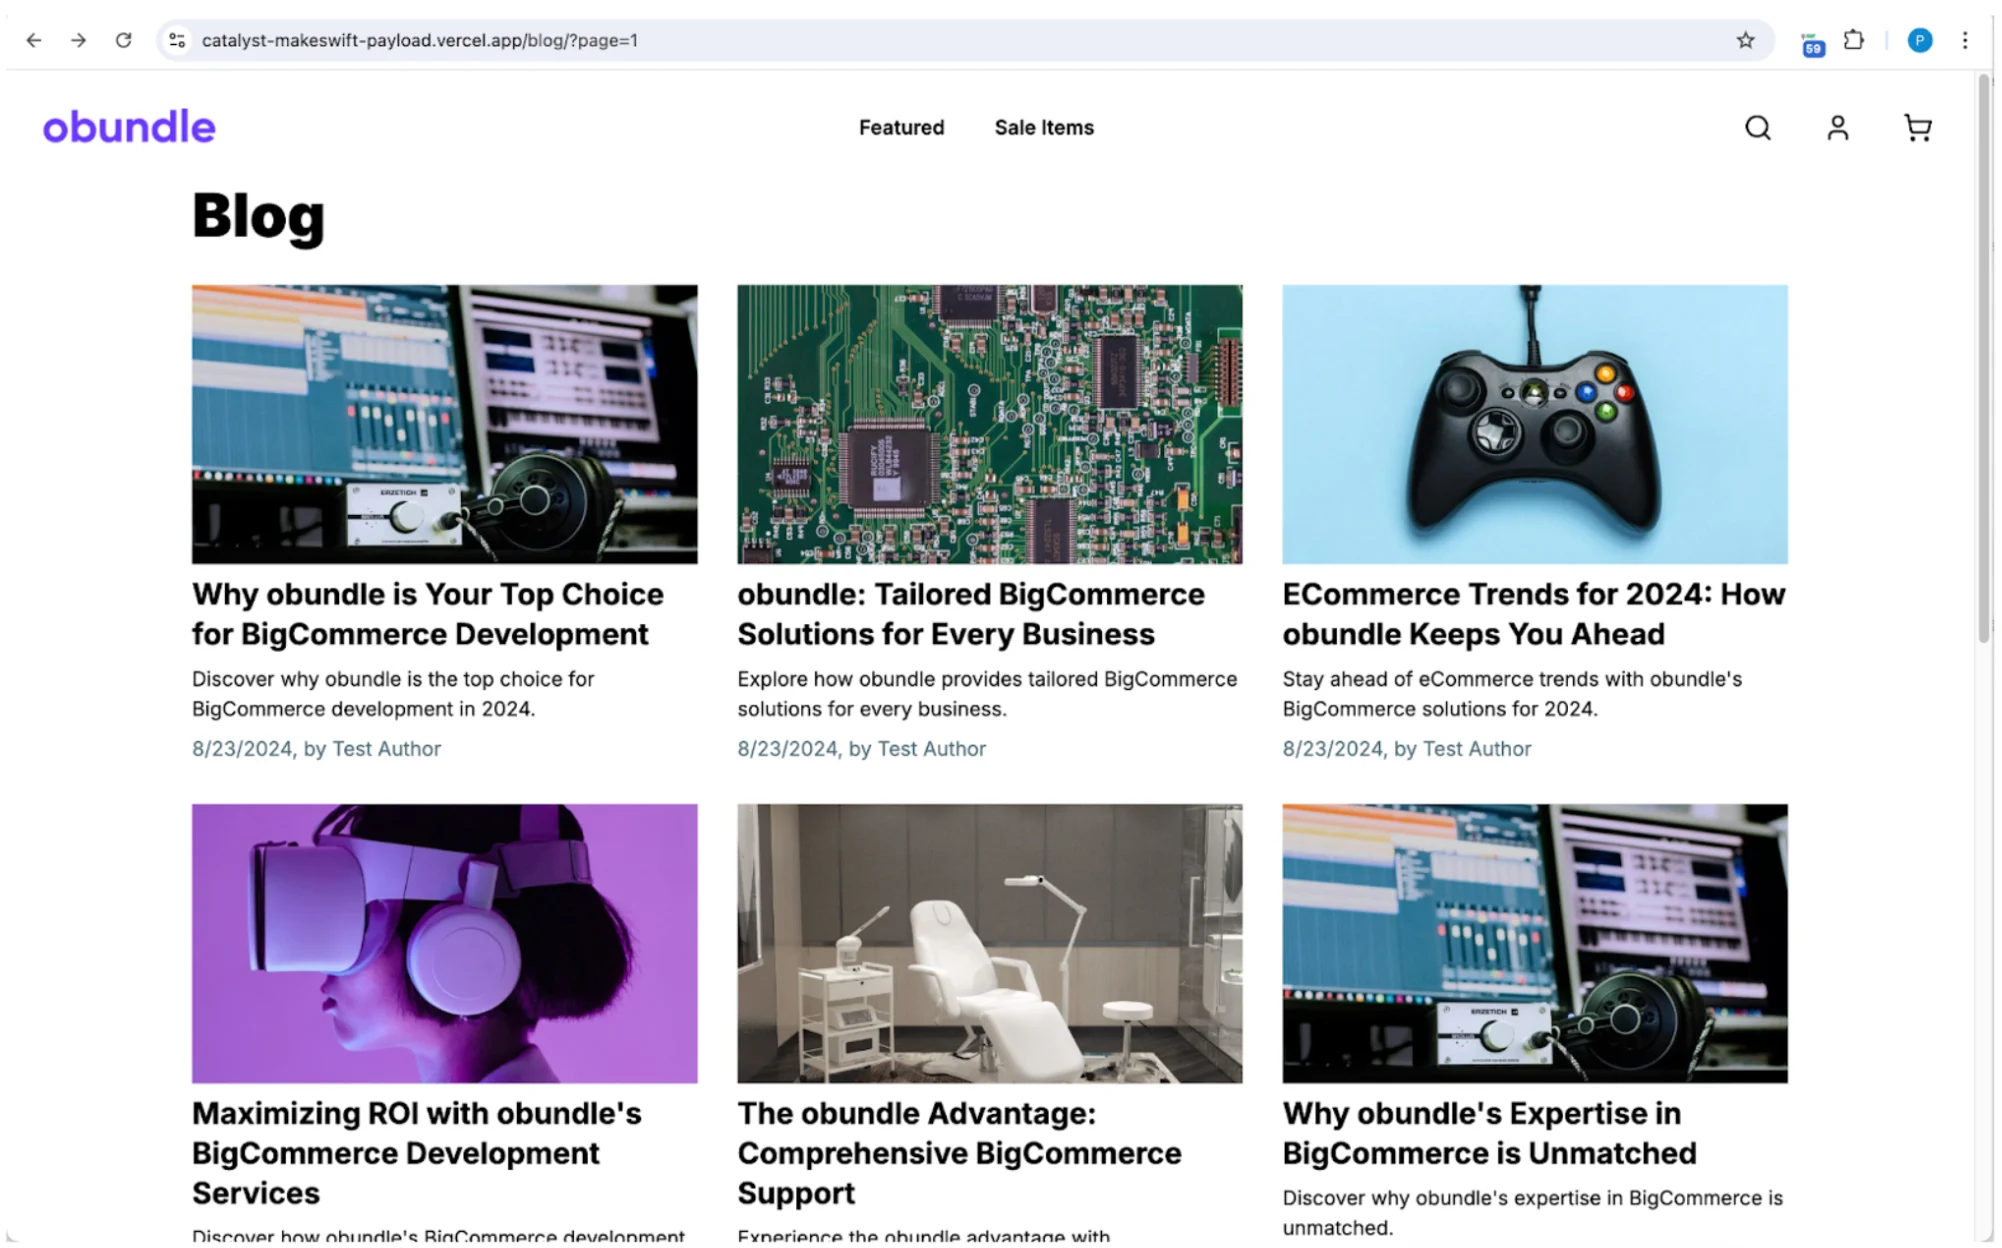
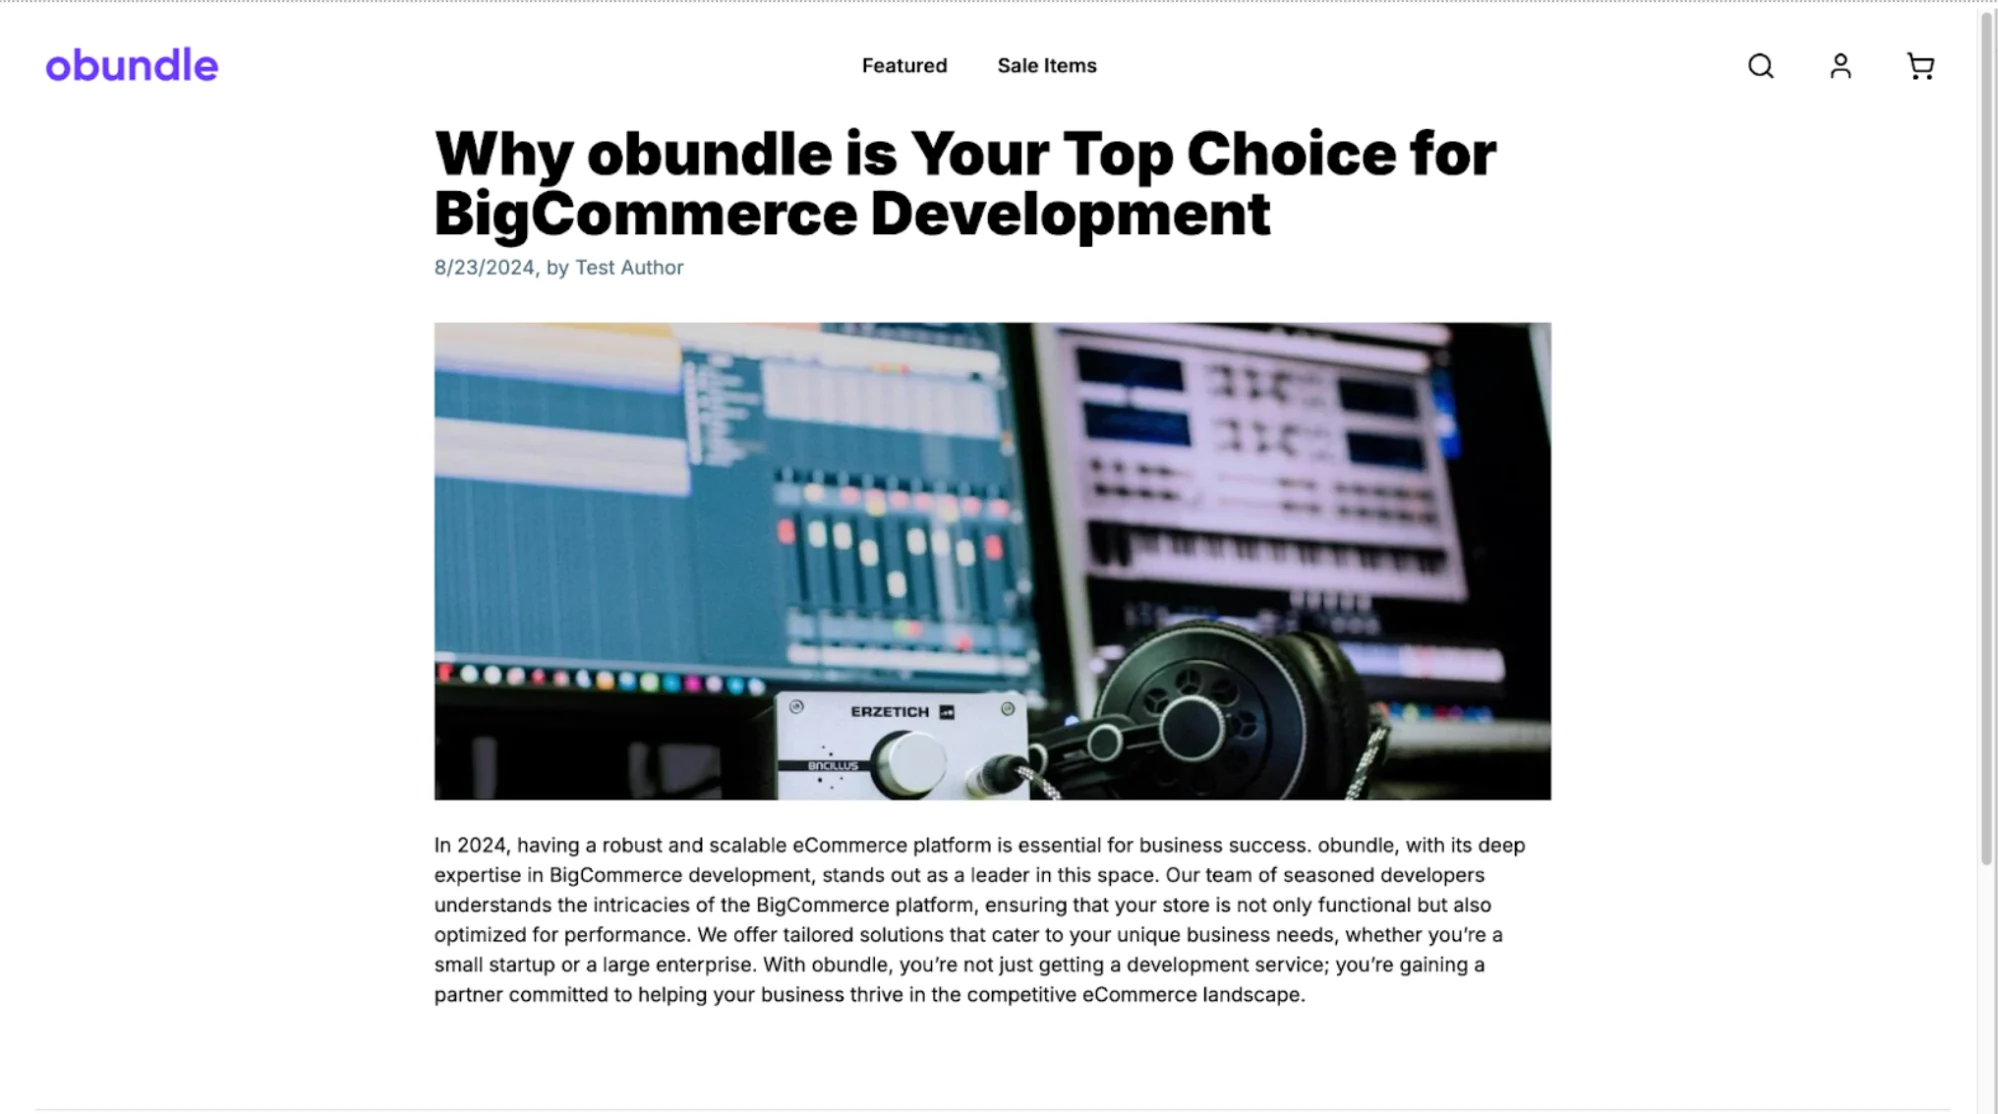
After deploying our Payload and Catalyst repo’s to Vercel, we have blogs on our Catalyst site! 🎉
Next.js Revalidation
After Catalyst and Payload are deployed to Vercel, we can also add or edit blogs on the live Payload site. However, by default, the blog data will be cached by Next.js on the Catalyst site. Luckily, it’s fairly easy to create an api in Catalyst to revalidate the blog pages. We can then set up a hook in Payload so that anytime a blog is added and changes, payload will make a request to the Catalyst revalidation endpoint, refreshing the blog data on the live site. No more waiting on builds! 🎉
To revalidate our blog pages we’ll first add a utility file: https://gist.github.com/pvaladez/897fe90a8bcecf7ae9479879c2524c56#file-revalidate-ts
Then we’ll add a payload hook function that will be called after a blog is changed: https://gist.github.com/pvaladez/897fe90a8bcecf7ae9479879c2524c56#file-revalidatepost-ts
Lastly for payload, we’ll set up our revalidatePost function with the afterChange hook. Then, we'll add this to the BlogPosts collection file:
hooks: {
afterChange: [revalidatePost],
},
Finally, we’ll create the /api/revalidate API route handler in Catalyst:
https://gist.github.com/pvaladez/3f2ef82f9cd7bf02a2ac7c989659cb3d#file-route-ts
Before You Deploy
There are a couple new environment variables used in the code above, so those will need to be set up locally and on Vercel.
What’s Next?
Next.js has made some big changes with the introduction of the app router and React server components. Although there are some growing pains, there are also many improvements. The fact that we can integrate a visual drag-and-drop page builder like Makeswift into a Next.js site with a simple CLI option with Catalyst is a good sign of those improvements.
And, what’s more, it’s never been easier to fetch data from an external CMS like Payload. In fact, when Payload version 3 is made stable(after Next.js v15 is released), you won’t need to fetch data from an API, because you’ll be able to get data directly from Payload. Additionally, you should be able to use Catalyst, Makeswift, and Payload on one instance, and one deployment of Next.js.
Payload version 3 also uses the Lexical rich text editor which gives you a lot of flexibility with rich text fields, and they’ll even have a live preview function in the Payload admin panel! The future of possibilities looks bright for Catalyst, Makeswift, and Payload!
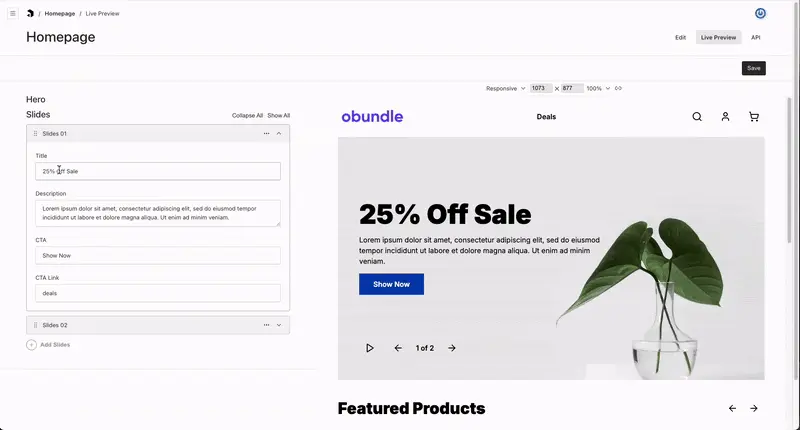
Editing the carousel in Catalyst’s homepage in Payload CMS’s live preview mode: